


This morning we started with a 3 phase induction motor. The first thing was to identify the terminals by measuring the resistance and labeling the wires. 294 Ohms was the winding resistance.
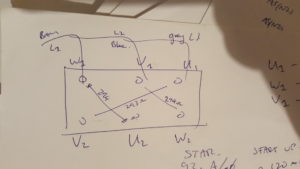
We then wired it in star configuration was meant linking V2, U2, W2 together. Star provides lower voltage which means lower start current. This is a good thing. The 3 phase wire needs to be in order of red, white, blue. ie Brown, white/grey, blue. The running current was 93mA but it initially shot up to 120mA showing the in rush current.
We then converted to delta config which meant linking vertically. ie W1 – V2, V1 – U2, U1 – W2. This meant that 400v was applied across the windings.
Reversing the motor was a matter of changing 2 of the phases.
We then worked on understanding a 3 switch heater (Off, Low, Medium, High) and how internally it is basically 2 resistors wired in 3 different ways. By itself, in series and in parallel. It is a very clever way to achieve the 3 settings using basic principles from science class as high school.
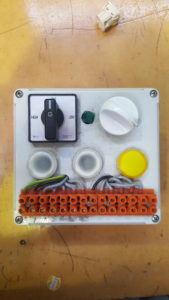
These aren’t used anymore because they are more complicated and more expensive than a simerstat (energy regulator). Basically a dial knob that lets you control the heat on a fan heater or an oven.
After that we labeled some drawings and identified some cables and filled the results in our worksheet. We then continued with our stage 1 and stage 2 workbook.
We were dismissed at 1pm because another group was using the set up that we were to use. We ended up watching them in preparation for tomorrow where we will have to wire up a stage 2 board with 3 phase input, 3 RCD’s (one of the 3 phase), some sockets, some lights and a 3 way switch.
Note:
- There can be up to 5% discrepancy allowed between the winding resistance. If it is over, replace the motor.