


It sounds daunting at first but when you go through the process, it’s quite simple. First, you need the right equipment.
1. Raspberry Pi. (Kinda goes without saying).
2. USB to TTL Serial Cable. (http://www.adafruit.com/product/954).
I actually got mine from https://nicegear.co.nz/raspberry-pi/usb-to-ttl-serial-cable-debug-console-cable-for-raspberry-pi/ as I thought the price was similar but I didn’t take into account the $5 postage which snuck in at the end.
Why connect via USB TTL Serial Cable?
The advantages of a serial USB cable are that you won’t need extra keyboards, mouse or external displays attached. You don’t even need an extra power supply.
How to connect it up?
To connect it up, you’ll have to know the layout of the GPIO (General Purpose Input Output) pins. The official pi website has the pin numbering system (https://www.raspberrypi.org/documentation/usage/gpio/) but this site has included the definition also. http://pi.gadgetoid.com/pinout.
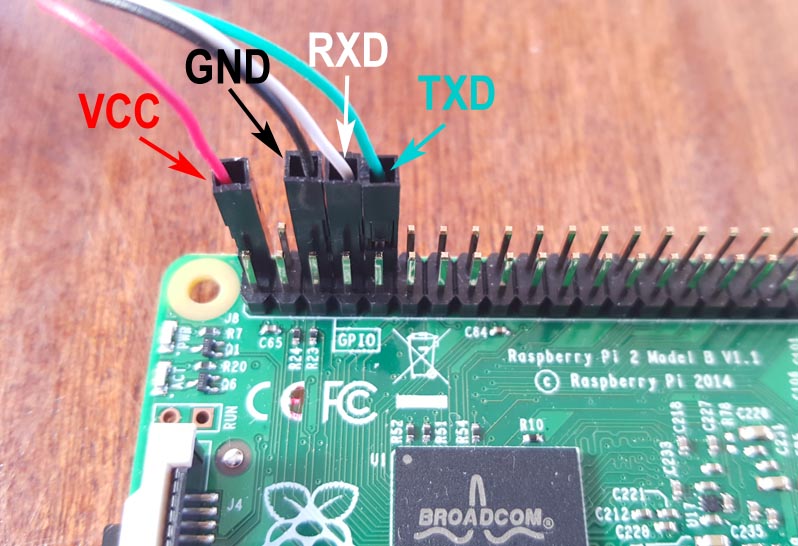
- VCC → RPi Pin 02 (DC Power 5V)
- GND → RPi Pin 06 (Ground)
- TXD → RPi Pin 08 (TX)
- RXD → RPi Pin 10 (RX)
If the cable you have is not labeled or the colours are different then you’ll have to consult the manual or manufacturer.
Remember that with the red cable connected (VCC), the Pi will already be powered. If you add an external power supply you may damage the Pi. Alternatively, do not connect the VCC lead and use the micro USB power instead. I find it more convenient with VCC connected as there is 1 less wire/adaptor to contend with but it does depend if you have enough current to power the Pi from your USB plug.
If you are running Ubuntu 14.04, chances are that you’ll have the driver already.
The commands
Jump into Ubuntu and open up a terminal. (Atl + Ctrl + T is the shortcut).
Run this command
>> ls /dev/ttyUSB*
You should get:
>> ls: cannot access /dev/ttyUSB*: No such file or directory
This is good. It just means you haven’t connected the USB cable to the computer yet.
Connect the device and now you should get:
>> ls /dev/ttyUSB*
>> /dev/ttyUSB0
You can also run
>> dmesg | grep usb
[ 234.805284] usbserial: USB Serial support registered for pl2303
[ 234.893205] usb 2-2: pl2303 converter now attached to ttyUSB0
This will show you which ttyUSB port to connect on.
Next run:
>> sudo screen /dev/ttyUSB0 115200 and you should get:

If you don’ have screen, run:
>> sudo apt-get install screen
What is screen?
If you get “[screen is terminating]” it will be because you do not have permission. Add “sudo” in front.
It is possible to get this working on windows with putty and drivers but it can get frustrating. My recommendation is that if you are serious, ditch windows as at times, it can drive you up the wall.
Really thanks a lot,