


So you finally have Mule ESB installed in AWS EC2. How do you test and verify it? What you can do is upload a project and try it out.
Overview:
- Upload a sample project via scp to AWS.
- Modify the security rules in AWS
- Test helloworld application
First, you should know how to deploy apps to Mule. Basically from Anypoint Studio, do a File > Export
https://developer.mulesoft.com/docs/display/current/Importing+and+Exporting+in+Studio

Step 1: Upload Mule project
You can upload your own project or download this sample project helloworld.
Run this command:
sudo scp -i /path/to/cert path/to/file ubuntu@ec2-52-0-213-172.compute-1.amazonaws.com:/path/to/folder
eg sudo scp -i muledemo.pem helloworld.zip ubuntu@ec2-52-21-5-173.compute-1.amazonaws.com:mule/mule-enterprise-standalone-3.7.1/apps
This does a secure copy transfer of the project file to the Ubuntu server in AWS.
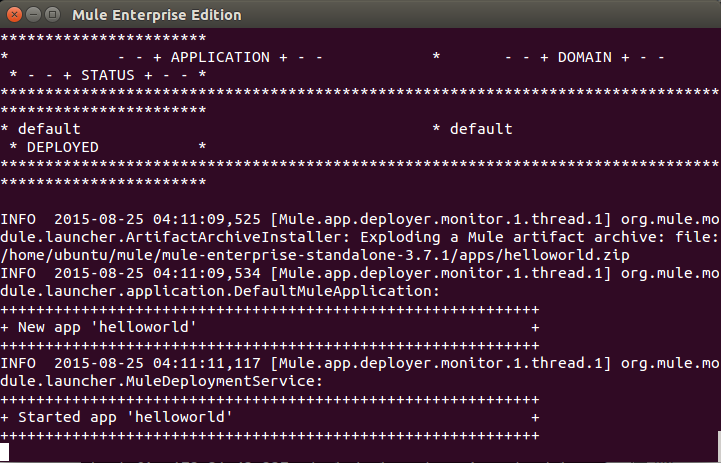
This will upload the project to the apps folder. You should then see:
Now, if you were to run this within Anypoint Studio, the URL would be http://localhost:8081/hi?name=superman
There are 2 options from here. You can send a GET request to Mule internally using this command:
Step 2a: Test the application via the Internal AWS IP.
>> curl -X GET 172.31.27.1:8081/hello?name=superman (replace IP with your internal IP)
Step 2b: Test the application in your browser
Grab a public Elastic IP (http://docs.aws.amazon.com/AWSEC2/latest/UserGuide/elastic-ip-addresses-eip.html)
Click ElasticIP > Allocate New Address (there maybe costs associated here).
Then Actions > Associate IP and select your instance.
Next, you want to open up the security rules (just for testing purposes and NOT for production) to ALL.


Once you have done this, you can then use your own browser and enter:
