


This post here got me started on the right track. Here, I specifically focus on the Arduino Due.
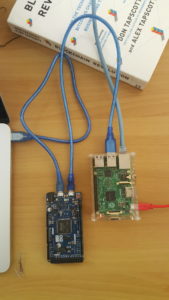
Step 1: First connect your computer to the Arduino Due to the programming USB slot. The one closest to the power supply barrel. Connect the native USB to the raspberry pi.
Step 2: Double check that the pi can “see” the new connection. Run
>> ls /dev/tty*
and you should see something like
/dev/ttyACM0
Step 3: Upload this code to the Arduino Due
void setup(){
  Serial.begin(9600);
}

void loop(){
  SerialUSB.println("Hello Pi");
  delay(2000);
}
What got me was the extra “USB” required for the Due. This took me hours to figure out.
Step 4: On the Raspberry Pi side run this python code.
import serial
ser = serial.Serial('/dev/ttyACM0', 9600)
while 1 :
    ser.readline()
There are 2 ways you can do this. Save the above code as hipi.py and then execute it via
>> python hipi.py
or you can type it directly into the python command line. This is what you should see.
Troubleshooting:
- Check you have python installed on your raspberry pi. It should be installed by default.
- Check you are using the right kind of USB cable. It has to be the right one.
- Serial.println(“hello world”) won’t work. It has to be SerialUSB.println(“hello world”)
Note that unlike the raspberry pi where you could damage it by powering it with an external supply as well as the GPIO pins, plugging in 2 USB cables is fine. The Due will figure out where to take the power source from.
Thank you for the very helpful tutorial. I am about to work on a project with a very similar connection. Do you have the Raspberry Pi connected to the same laptop or a separate device.
Thank you
GG
I connect to the Pi on the network via SSH but you can connect it to the laptop directly if you want. You just need a USB to TTL Serial Cable. (http://www.adafruit.com/product/954).