


Here is the easiest and quickest way to get up and running with an Arduino Due on a Mac.
Step 1: Plug the micro usb to the usb port closest to the DC power supply. This is called the programming port. (ref: https://www.arduino.cc/en/Main/arduinoBoardDue)
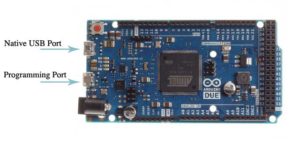
Plug the other end into your Mac.
Step 2: Download the Arduino software for Mac at https://www.arduino.cc/en/guide/macOSX
Step 3: You will have to install what is called the Sam Boards Core (32 bit ARM Cortex-M3). Check out this link https://www.arduino.cc/en/Guide/Cores. Basically go to Tools > Board > Boards Manager and select Sam Boards Core (32 bit ARM Cortex-M3) by Arduino.
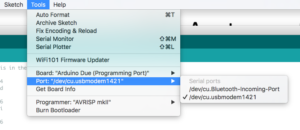
Step 4: Tell OSX the port to connect to the Arduino. It will be something like /dev/cu.usbmodem1421
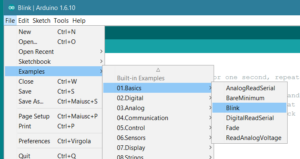
Step 5: Open the Blink sketch. Sketch is the equivalent of “code”. This will make the “L” led blink.
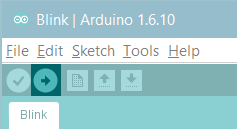
Hit the arrow icon to upload to the Arduino.
Ref: https://www.arduino.cc/en/Guide/ArduinoDue
You should now see the LED blink. Try changing the values to change the blinking speed.